 Wiga Tap Manufacturer
If you’re wondering exactly how to install a shower valve kit — the part behind the wall that actually controls your water, not just the pretty handle you see — the honest answer is that it’s very doable for a confident DIYer, but the order of operations matters more than raw plumbing skill. Get the valve depth wrong or skip the pressure test, and you’ll be opening the wall again. Get it right, and you’ve saved the $250–$600 a plumber would charge for the same afternoon of work.
This guide walks through the full process — rough-in valve, supply connections, testing, and trim — plus the mistakes that send people back to the hardware store. We install and test fixtures like these every week, so we’ll be blunt about where DIY makes sense and where it doesn’t.
What exactly is a “shower valve kit,” and what comes in the box?
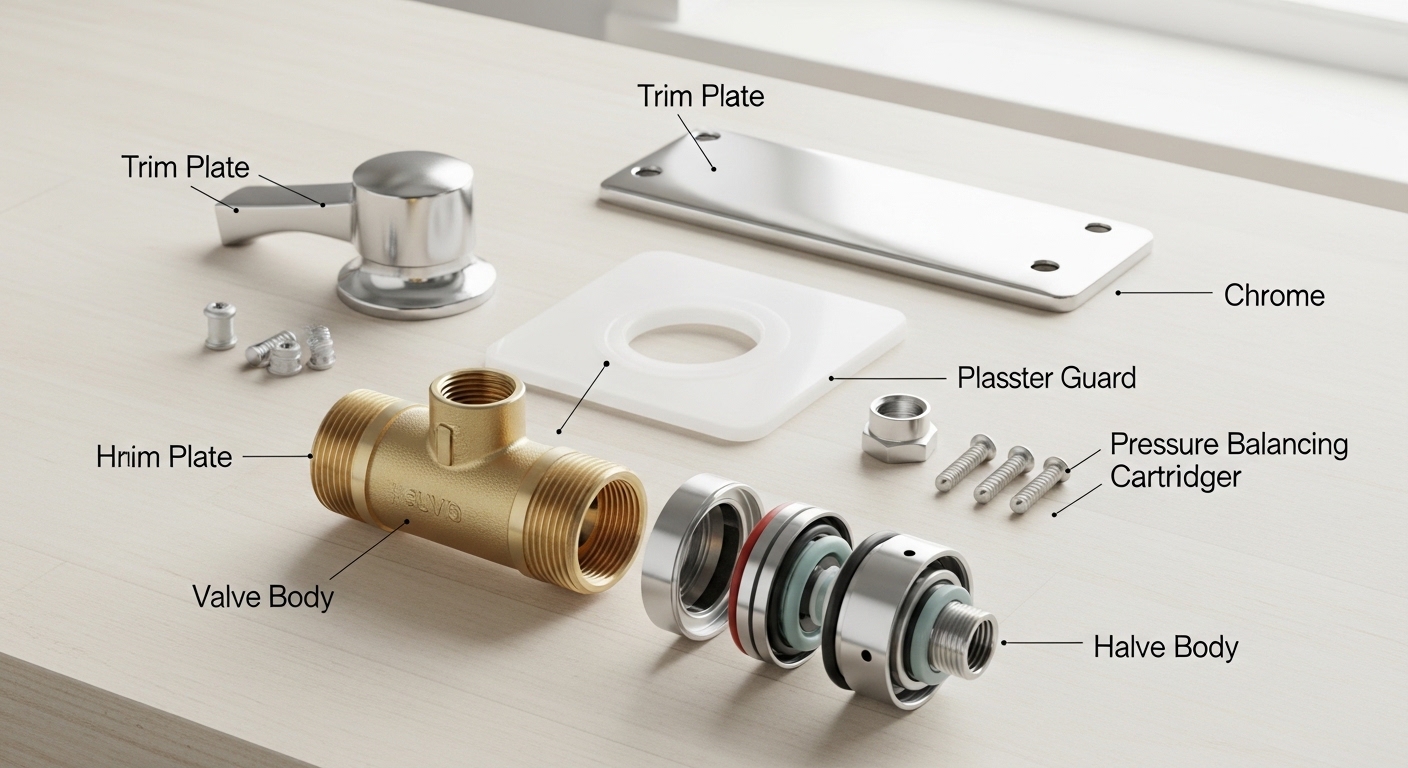
A shower valve kit is the combination of the rough-in valve body (the brass block that hides inside the wall and mixes hot and cold) plus the trim kit (the handle, escutcheon plate, and showerhead you see on the outside). Some brands sell these separately; most DIY-friendly kits bundle both.
Here’s what you should find when you open a typical kit:
- Valve body — usually brass, with 4 ports: hot inlet, cold inlet, showerhead outlet (top), and often a tub-spout outlet (bottom).
- Cartridge — the moving part that regulates temperature and flow. Most modern kits use a pressure-balancing cartridge; premium ones use thermostatic.
- Plaster guard (mud guard) — a plastic cap that protects the valve during construction and, critically, sets your finished wall depth.
- Trim kit — handle, escutcheon (wall plate), sleeve, and mounting screws.
- Showerhead and/or tub spout — included in full kits, sold separately in valve-only kits.
Before you buy anything, confirm whether your kit is a tub/shower combo (has a diverter and a bottom tub-spout port) or a shower-only valve (the bottom port is plugged). If you’re planning a tub-and-shower setup, the diverter lives in the valve or the spout — and a good quality tub spout with diverter is what routes water up to the head, so match those parts before you’re mid-install.
What tools and materials do I actually need before I start?
You need soldering or PEX tools, a way to shut off the water, and the right fittings for your pipe type — gather everything before you cut into anything. Nothing kills a Saturday install faster than a trip to the store with the water off and the wall open.
Here’s the realistic shopping list for a standard copper or PEX install:
- Propane torch, lead-free solder, flux, and emery cloth (for copper) — or a PEX crimp/cinch tool and rings (for PEX)
- Tubing cutter
- Adjustable wrench and channel-lock pliers
- Teflon (PTFE) plumber’s tape and pipe-thread compound
- Screwdrivers and an Allen/hex key set
- A short piece of 2×4 or a valve mounting bracket to secure the body
- Rags, a bucket, and a fire-resistant cloth if you’re soldering near studs
One material note that trips people up: many valve bodies have threaded (IPS/NPT) inlets rather than sweat (solder) connections, which lets you use threaded adapters or a faucet hook up adapter instead of firing up a torch. If soldering makes you nervous, buy a valve with threaded or push-to-connect ports — it’s a legitimate, code-approved path.
Step by step: how do you install a shower valve kit the right way?
Install a shower valve kit in seven stages: shut off water, position the valve at the correct depth, connect the four ports, secure the body, pressure-test, close the wall, then mount the trim. Follow that order and you’ll almost never have to redo work. Here’s each stage in detail.
1. Shut off the water and drain the lines
Turn off the main water supply (or the branch shutoff feeding the bathroom), then open the lowest faucet in the house and the tub spout to drain residual water and relieve pressure. You cannot solder a joint with water sitting in the pipe — it turns to steam and prevents the solder from flowing. Stuff a small piece of bread or a soldering “wick” pill into a stubborn wet line if a few drops keep weeping.
2. Set the valve at the correct depth — this is the #1 mistake
Position the valve body so the finished wall surface (tile, backer board, and thinset) falls within the depth range molded onto the plaster guard. Almost every plaster guard has “min” and “max” lines. If the valve sits too deep, your trim plate won’t reach the wall; too shallow, and the handle binds. Measure from the face of the studs and account for your backer board (typically 1/2″) plus tile (about 1/4″–3/8″).
Mount the body to a cross-brace (a 2×4 between studs) or a manufacturer bracket so it can’t shift when someone leans on the handle for the next 20 years. Keep the valve plumb and level — a tilted valve means a crooked handle forever.
3. Connect the four ports: hot, cold, shower, and tub
Connect the cold inlet to the right side, hot to the left (facing the valve), the top outlet to the shower riser, and the bottom outlet to the tub spout — or cap the bottom on a shower-only setup. Orientation is stamped right on the brass (“H” and “C,” plus arrows). Getting hot and cold reversed is annoying but survivable; getting the top/bottom outlets swapped means water comes out the wrong fixture.
If you’re soldering, remove the cartridge first — the heat will destroy its rubber O-rings and plastic internals. This is the single most common way DIYers ruin a brand-new valve. Slide the cartridge back in only after everything has cooled. For PEX or threaded connections, wrap male threads with 3–4 turns of PTFE tape and snug (don’t gorilla-tighten — brass cracks).
4. Secure the shower riser and drop-ear elbow
Run the vertical riser pipe from the top port up to a drop-ear elbow anchored to a stud at showerhead height (usually 78–80 inches from the floor). This elbow is what your shower arm threads into, so it has to be rock-solid — a wobbly elbow leads to a leaking, sagging showerhead down the road.
5. Pressure-test BEFORE you close the wall
Reinstall the cartridge, turn the water back on slowly, and open the valve to check every joint for leaks — do this while the wall is still open. This 10-minute step is what separates a clean job from a drywall-tearing disaster. Run it hot and cold, check the tub/shower diverter, and watch each connection for 15–20 minutes. Dry it all with a rag and look again for slow weeps.
6. Close the wall, then install the trim kit
Once you’re leak-free, install cement backer board, waterproofing, and tile. Then remove the plaster guard, slide on the escutcheon and sleeve, attach the handle, and thread on the shower arm and head using PTFE tape. Tighten by hand plus a quarter-turn — over-torquing the trim screws strips them fast.
If somewhere down the line the handle won’t reach the wall because the valve ended up a hair too deep, a tap valve extender can rescue the install without reopening tile — but nail the depth in step 2 and you’ll never need it.
Pressure-balancing vs. thermostatic vs. diverter valves — which kit should I buy?
Buy a pressure-balancing valve for most standard single-head showers, a thermostatic valve if you want precise temperature control or run multiple sprays, and make sure it has a diverter if you’re feeding both a tub spout and a showerhead. Here’s how they stack up:
| Valve type | Best for | How it works | Typical price (valve + trim) |
|---|---|---|---|
| Pressure-balancing (single-handle) | Most standard showers | Keeps temperature steady when someone flushes a toilet; one handle controls temp + flow together | $90–$220 |
| Thermostatic | Spa showers, body sprays, precise temp | Holds an exact set temperature; separate controls for temp and volume | $250–$600 |
| Diverter / tub-shower combo | Tub + shower on one valve | Routes water between spout and head; often built into the valve or spout | $120–$350 |
| Volume/2- or 3-way (multi-outlet) | Rain head + handshower + body jets | Sends water to multiple outlets simultaneously or in sequence | $300–$800 |
One critical compatibility point: trim and valve must be the same brand and family. A Moen trim will not fit a Delta rough-in, and even within a brand there are different valve lines. If you’re replacing only the trim, identify your existing valve first — the same principle applies when you’re matching a single handle faucet cartridge to its body. Mismatched parts are the number-one reason “quick” trim swaps turn into full valve replacements.
How long does it take, and how much does a DIY install really cost?
A DIY shower valve install takes most people 3–5 hours and costs $150–$400 in parts, versus $350–$700 if you hire a plumber for labor alone. The wide range comes down to whether you’re doing new construction (open wall, easy) or a retrofit (working through a small access hole, much harder).
Here’s a realistic cost breakdown:
- Valve + trim kit: $90–$600 depending on type and finish
- Fittings, solder/PEX rings, tape: $20–$50
- Tools you may not own (torch, PEX crimper): $40–$120 one-time
- Backer board, thinset, tile repair: $30–$150 if you opened a tiled wall
If you’d rather compare the DIY math against professional labor for a broader project, our breakdown of how much a plumber charges to install a bathroom faucet gives you real 2026 numbers to weigh against your own time and comfort level.
When should I NOT do this myself and call a pro instead?
Call a professional if you have to reroute pipes inside a finished, tiled wall with no access panel, if your home has old galvanized or lead piping, or if local code requires a permit and inspection for the work. There’s no shame in it — a leak inside a sealed wall can cause thousands in hidden water damage, which dwarfs a plumber’s fee.
Specific red flags that mean “get help”:
- You’d have to demolish finished tile with no way to test for leaks before re-closing
- Existing pipes are corroded galvanized steel (they crumble when you work them)
- You smell gas, or the wall shares space with electrical you’re not comfortable near
- Your municipality requires a licensed plumber for shower rough-ins (check first)
Everything short of that — swapping an old cartridge, upgrading trim, or a straightforward new-construction valve on accessible copper or PEX — is squarely in DIY territory. If you’re really just replacing worn internals rather than the whole body, start with our guide on how to remove an old shower faucet cartridge before you commit to a full valve swap.
FAQ
Do I have to solder to install a shower valve kit?
No. Many valve bodies come with threaded (IPS) inlets that accept push-to-connect or threaded adapters, and PEX connections require only a crimp or cinch tool. Soldering copper is one option, not a requirement — choose a valve with threaded or push-fit ports if you want to avoid a torch entirely.
Can I replace just the trim without touching the valve inside the wall?
Yes, as long as the new trim is the same brand and valve family as your existing rough-in. Identify the manufacturer stamped on the valve or cartridge first. If the new trim doesn’t match the valve, it physically won’t seat — and you’ll be into a full valve replacement, which means opening the wall.
How deep should the shower valve sit in the wall?
The finished wall surface should land between the “min” and “max” lines on the plaster guard — typically leaving the valve face about 1/2″ to 1-3/4″ behind the finished tile, depending on the brand. Measure your backer board plus tile thickness and set the valve accordingly before you close anything up.
Why does my new shower valve leak after installation?
The most common causes are a cartridge damaged by soldering heat, an under-tightened threaded joint, or PTFE tape wrapped the wrong direction. Remove the cartridge before soldering, wrap tape clockwise 3–4 turns, and always pressure-test with the wall open so you can catch and fix a weep before it’s sealed behind tile.
Do I need a permit to install a shower valve?
It depends on your municipality. Replacing existing trim usually doesn’t require one, but a new rough-in valve or repiping often does, along with an inspection. Check with your local building department before you start — an unpermitted install can complicate a future home sale and void some insurance claims.
What’s the difference between a pressure-balancing and thermostatic valve?
A pressure-balancing valve keeps water temperature steady when pressure fluctuates (like a toilet flushing) but controls temperature and flow with one handle. A thermostatic valve holds an exact temperature you set and has separate temp and volume controls, making it ideal for multi-spray or spa showers. Most standard bathrooms are well served by a pressure-balancing kit.
A note on doing this right
Author note: This guide was written by the wigafaucet fixtures team, who install, bench-test, and pressure-cycle shower valves and trim kits as part of our product QA. We’ve watched hundreds of these installs succeed and fail, and nearly every failure traces back to two things: valve depth and skipping the pressure test.
Why trust wigafaucet: we manufacture and sell shower valves, trim kits, and bathroom fixtures, and we test our valve bodies to standard pressure and cycle-life benchmarks (ASME A112.18.1 / CSA B125.1 for the North American market) so the cartridge you install still seals smoothly after years of daily use. Reputable kits carry these certifications along with a manufacturer warranty — often lifetime on the valve body and finish for residential use. Always keep your receipt and register the product; warranty coverage frequently requires proof of correct installation, which is one more reason to pressure-test and photograph your work before you close the wall.
Take your time on depth and testing, match your trim to your valve, and a shower valve kit is one of the most satisfying — and money-saving — plumbing upgrades you can do yourself.