 Wiga Tap Manufacturer
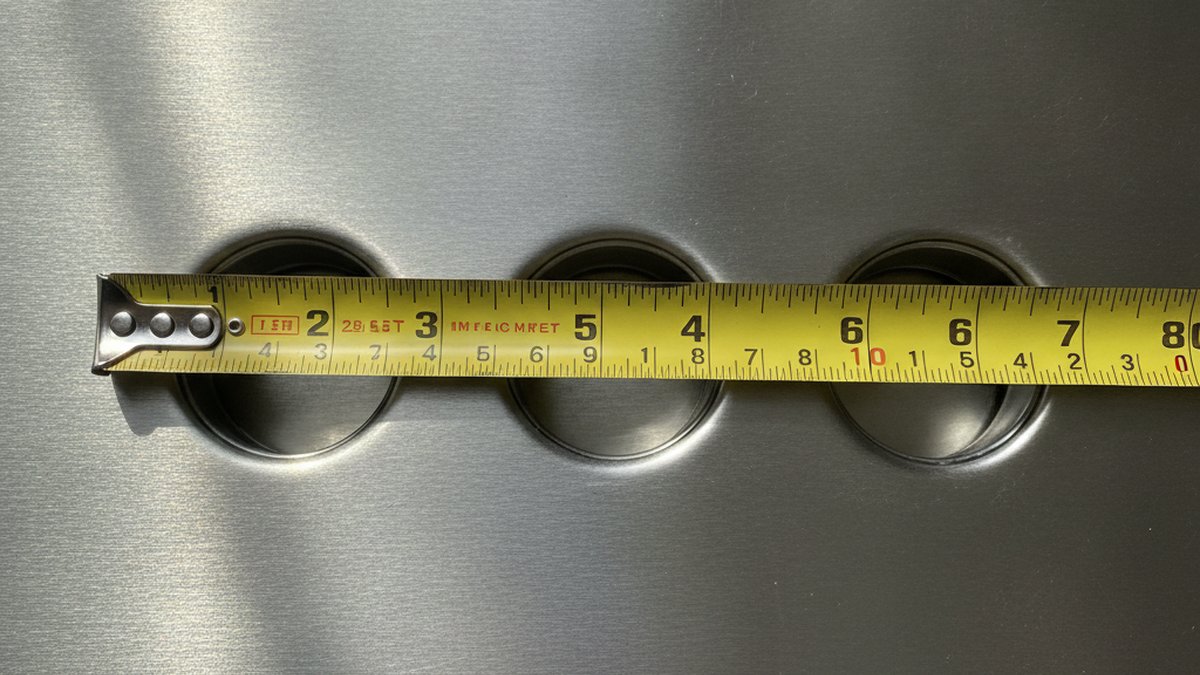
If you’re replacing a kitchen faucet with 3 holes, the single most important thing to get right before you buy anything is what those three holes are for and how far apart they sit. A 3-hole sink was drilled to hold a spout in the middle and two handles (or a sprayer/soap dispenser) on the sides, typically on 4-inch centers. Get the layout right and this is a genuinely easy Saturday-morning repair. Get it wrong and you’ll be standing in the aisle with a faucet that leaves ugly gaps or won’t reach the holes at all.
This guide walks you through exactly how to identify your setup, pick the right replacement, and swap it out — including the annoying parts nobody warns you about, like a rusted mounting nut or a hidden third hole you forgot was there.
What does “3 holes” on a kitchen sink actually mean?
Three holes means your sink deck (or countertop) was pre-drilled with three openings: one center hole for the faucet body/spout, and two outer holes. On most residential sinks those outer holes are 4 inches from center to center — the classic “centerset” or “standard 3-hole” layout. The outer holes originally held two handles (hot and cold) or, on a single-handle faucet, one held a side sprayer and the other held a soap dispenser or air gap.
Here’s why it matters: your new faucet has to either fill all three holes or cover the ones it doesn’t use. There is no third option that looks good. A bare, uncovered hole in your countertop is both an eyesore and a spot for water to drip under the sink.
Before you shop, figure out three numbers:
- Hole spacing: the distance from the center of one outer hole to the center hole. Standard is 4 inches; some setups run 6, 8, or up to 8+ inches.
- Hole diameter: most faucet holes are 1⅜” (1.375″) but can be up to 1½”. Almost every standard faucet fits this.
- What’s in each hole now: two handles? A sprayer? A soap pump? This tells you what you’re replacing versus what you might abandon.
If your holes are much wider apart than 4 inches, you likely have a widespread layout — a different animal. We break down the difference between spacing standards in our guide to the 6″ centerset kitchen faucet and whether it fits your sink, which is worth a two-minute read if your measurement came out odd.
Can I put a single-handle faucet on a 3-hole sink?
Yes — and it’s the most popular upgrade. You put a single-hole faucet in the center hole and cover the two outer holes with a deck plate (also called an escutcheon or base plate). Most modern single-handle kitchen faucets ship with a deck plate in the box specifically for this reason, and it’s usually a 10-inch plate designed to span standard 4-inch-spaced holes.
This is the go-to move when people want to modernize. Older sinks came with clunky two-handle faucets plus a wobbly side sprayer; swapping to one sleek pull-down faucet instantly updates the whole kitchen. The deck plate hides the two now-empty side holes, and you’re done.
Two things to confirm before you commit to this path:
- Deck plate width: make sure the included plate is wide enough to cover holes at your spacing. A 10″ plate covers standard 4″ spread easily. If your outer holes are 8″ apart, you need a wider plate or a different faucet.
- Sprayer decision: if you’re ditching the old side sprayer, you’ll want that hole covered by the deck plate. If you’re keeping a separate sprayer or adding a soap dispenser, you can leave that hole open and use it.
| Replacement approach | How the 3 holes get used | Best for | Deck plate needed? |
|---|---|---|---|
| Single-handle faucet + deck plate | Center hole = faucet; 2 side holes covered | Modern look, easiest daily use | Yes (usually included) |
| Single-handle faucet + soap dispenser | Center = faucet; 1 side = soap pump; 1 covered | Keeping a functional extra | Partial / small plate |
| True 3-hole (two-handle) faucet | Center = spout; 2 sides = hot & cold handles | Traditional / period kitchens | No |
| Single faucet + side sprayer | Center = faucet; 1 side = sprayer; 1 covered | Want a separate spray hose | Small plate for extra hole |
How do I measure my 3-hole sink so I buy the right faucet?
Measure center-to-center: put a tape measure on the middle of the left hole and read to the middle of the right hole, then divide by two to get the spread from center — or just measure center hole to one outer hole. For a standard sink that outer measurement is 4 inches, giving an overall 8-inch spread across all three. Also check that each hole is about 1⅜” across so a standard faucet shank drops through.
Do this before you shop, not after. The number one reason a faucet swap goes sideways is someone assuming “a faucet is a faucet.” Write down:
- Center-to-outer hole distance (e.g., 4″).
- Total left-to-right spread (e.g., 8″).
- Hole diameter (e.g., 1.375″).
- Countertop/deck thickness — thick granite or a thick sink rim eats up the faucet’s threaded shank; deep-mount faucets exist for this.
- Clearance behind the sink to the backsplash or window — pull-down spouts need room to arc back.
If any hole measurement looks unusual or the holes are unevenly spaced (common on older custom countertops), snap a photo with a ruler in frame before you head to the store. That photo has saved countless second trips.
What tools and parts do I need before I start?
You need a basin wrench, an adjustable wrench, plumber’s putty or silicone, a bucket, a towel, and new supply lines — plus penetrating oil if anything’s corroded. The basin wrench is the non-negotiable one; it’s the only tool that reaches the mounting nuts jammed up behind the sink basin where a normal wrench can’t fit.
- Basin wrench — for the mounting nuts and supply-line nuts in tight spots.
- Adjustable / channel-lock wrench — for the shutoff valves and supply connections.
- New braided stainless supply lines — cheap insurance; never reuse crusty old ones.
- Plumber’s putty or silicone — to seal the deck plate/faucet base against the deck.
- Penetrating oil (e.g., PB Blaster) — for stuck or rusted nuts.
- Bucket + towels + flashlight/headlamp — the cabinet under the sink is dark and always holds leftover water.
Buy new supply lines that match your shutoff valve size (usually ⅜” compression) on one end and the faucet’s inlet on the other. If your shutoff valves are old and won’t fully close, that’s a separate small repair you’ll want to handle first — a valve that won’t seal turns a 45-minute job into a wet afternoon.
How do I actually replace a kitchen faucet with 3 holes, step by step?
The core process is: shut off the water, disconnect and remove the old faucet from below, clean the deck, set the new faucet (with deck plate if needed), reconnect the supply lines, and test for leaks. Realistically budget 45–90 minutes for a first-timer. Here’s the sequence that keeps it clean:
- Turn off the water at the hot and cold shutoff valves under the sink, then open the faucet to release pressure and drain the lines.
- Disconnect the supply lines from the shutoffs with your wrench. Have the bucket ready — water will dribble out.
- Remove the old mounting nuts with the basin wrench. This is where people get stuck; see the rusted-nut tip below.
- Lift out the old faucet and any sprayer/soap dispenser, then scrape off old putty and gunk. Clean the deck down to bare metal or stone so the new seal sits flat.
- Set the new deck plate and faucet. Run a bead of plumber’s putty or silicone under the deck plate, feed the faucet lines and shanks through the center hole, and hand-tighten the mounting hardware from below, then snug it.
- Connect the supply lines — hot to hot, cold to cold — hand-tight plus a quarter to half turn with the wrench. Don’t overtighten braided lines; you’ll crack the seal.
- Turn the water back on slowly and check every connection with a dry paper towel. Run hot and cold, swing the spout, and test the sprayer.
If your new faucet uses a pull-down sprayer, don’t forget to attach the quick-connect hose and the counterweight on the spray hose — a missing counterweight is why a sprayer won’t retract. And if, mid-job, you discover the leak you were chasing is actually coming from the hose connection rather than the faucet body, our walkthrough on why a kitchen faucet leaks from the flexible hose will tell you whether you even needed a full replacement.
What if the old faucet nut is rusted and won’t budge?
Soak the nut in penetrating oil, wait 15–20 minutes, and try again with a basin wrench for leverage; if it still won’t turn, your fallback is cutting it off with a mini hacksaw or an oscillating multi-tool. A seized mounting nut is the single most common thing that derails a 3-hole faucet swap, especially on sinks over ten years old where hard water and steel nuts have fused together.
Work through it in this order so you don’t round off the nut:
- Spray penetrating oil, wait, spray again. Patience beats muscle here.
- Use the long handle of the basin wrench for leverage; keep steady pressure rather than sudden jerks.
- If the plastic mounting nut is cross-threaded or brittle, it may simply crack off — that’s fine, you’re replacing it anyway.
- Last resort: cut through the nut or the shank with a hacksaw blade or multi-tool, protecting the sink surface with tape.
We wrote a whole detailed rescue guide for exactly this scenario — how to remove an old faucet nut that’s rusted, stuck, and buried under the sink — because it’s the step that turns a quick job into a two-hour battle. Read it before you start if your sink is old; it’ll save your knuckles.
3-hole vs single-hole vs widespread: which should I buy?
If you want the simplest, most modern result on a standard 3-hole sink, buy a single-hole faucet with the included deck plate. Choose a true 3-hole (two-handle) faucet only if you love the traditional look or want independent hot/cold control. Widespread setups are for sinks where the holes are 8″+ apart and can’t be bridged by a standard deck plate.
| Faucet type | Holes it fills | Look | Typical price range |
|---|---|---|---|
| Single-hole + deck plate | Fits any 1–3 hole sink (plate covers extras) | Modern, minimal | $60–$250 |
| True 3-hole two-handle | Requires exactly 3 holes at your spread | Classic, traditional | $80–$300 |
| Single-hole + separate sprayer/soap | Uses 2–3 holes functionally | Modern + utility | $90–$300 |
Material matters as much as layout for how long the faucet lasts. Cheaper faucets use zinc-alloy bodies that corrode faster around constant water exposure, while solid brass and stainless hold up for decades. If you’re deciding, our breakdown of zinc alloy vs stainless steel faucets explains which is worth the extra money for a kitchen that gets heavy daily use.
Author note & why you can trust this guide
This guide was written by the Wigafaucet product and installation team — the same people who spec, pressure-test, and support the faucets we sell. Every faucet we recommend for a 3-hole retrofit is tested to standard flow and durability benchmarks (we build to WaterSense and NSF/ANSI 61 lead-free standards for kitchen use) and backed by our warranty, so if a cartridge or finish fails within the coverage period, you’re covered. We’ve walked thousands of homeowners through this exact swap, and the advice above reflects the mistakes we see most often in real support tickets — not theory.
FAQ
Do I need a plumber to replace a kitchen faucet with 3 holes?
Usually no. If your shutoff valves work and the mounting nuts aren’t badly seized, this is a confident DIY job with a basin wrench in under 90 minutes. Call a plumber if your shutoff valves leak or won’t close, if the supply lines are hard-piped rather than flexible, or if a nut is so corroded it needs cutting and you’re not comfortable with a multi-tool near your sink.
Will a single-hole faucet cover the extra two holes?
Yes, as long as you use a deck plate wide enough for your hole spacing. Most single-handle kitchen faucets include a 10-inch deck plate that covers standard 4-inch-spaced side holes. If your outer holes are 8 inches apart or more, confirm the plate spans them before buying, or choose a faucet designed for that wider spread.
What size are standard kitchen faucet holes?
Standard faucet holes are 1⅜ inches (1.375″) in diameter, though some accept up to 1½ inches. Spacing between the center and each outer hole on a typical 3-hole sink is 4 inches. Almost every standard faucet shank is designed to drop through a 1⅜” hole, so diameter is rarely the problem — spacing is.
Can I turn a 3-hole sink into a 1-hole setup permanently?
Functionally yes — a deck plate covers the unused holes so cleanly that it looks like a single-hole sink. It’s not literally sealing the holes shut, but the plate plus plumber’s putty keeps water out and gives a finished look. If you ever want to go back to a two-handle or sprayer setup, the holes are still there under the plate.
How long does it take to replace a 3-hole kitchen faucet?
Plan on 45–90 minutes for a first-timer with the right tools. An experienced installer does it in about 30 minutes. The variable is almost always the removal step: a clean, non-corroded old faucet comes out in five minutes, while a rusted mounting nut can add half an hour on its own, so budget extra time if your sink is old.
Do I need new supply lines when I swap the faucet?
Yes, always use new braided stainless supply lines. They cost a few dollars, and reusing old, kinked, or corroded lines is the most common cause of a slow under-sink leak after a faucet swap. Match the fitting sizes to your shutoff valves (typically ⅜” compression) and the new faucet’s inlets, and hand-tighten plus a quarter turn — don’t overtighten.