 Wiga Tap Manufacturer
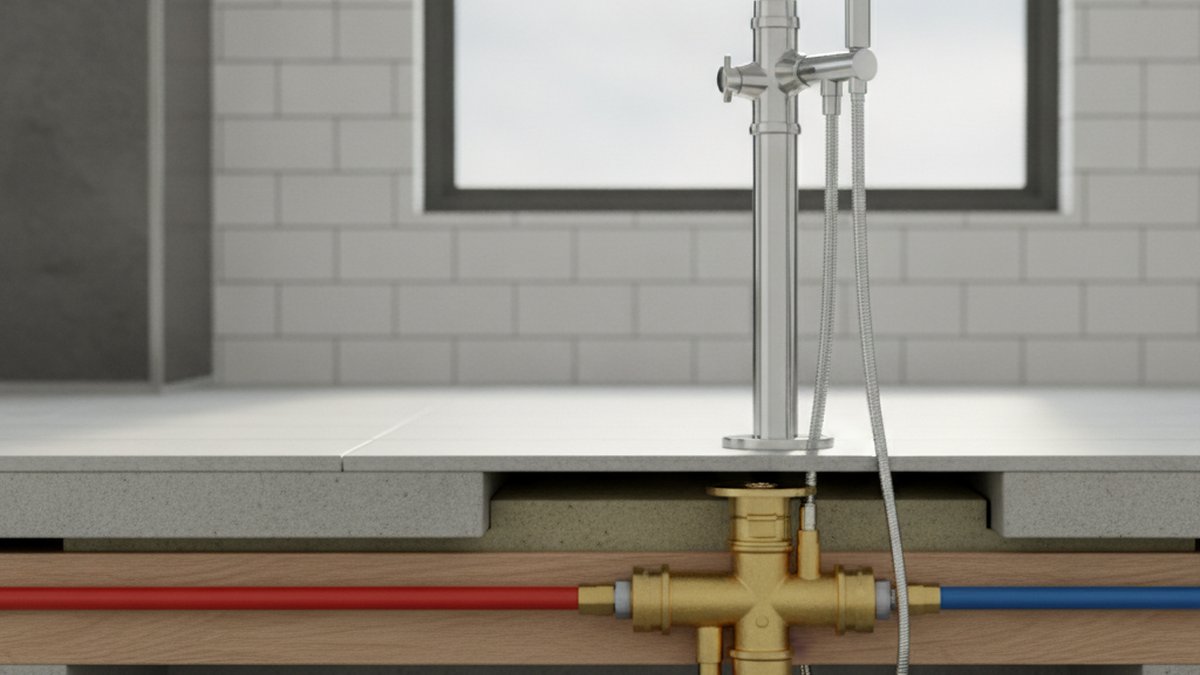
A freestanding tub faucet with rough-in valve is really two parts working as one: the polished tub filler you see standing next to the bathtub, and the hidden brass valve body buried in the floor that actually mixes hot and cold water and holds everything rigid. If you’ve been staring at product pages wondering why some fillers cost $180 and others cost $600 — or why the beautiful faucet you added to your cart says “valve sold separately” — this guide answers exactly what the rough-in valve does, when you need one, how to size it, and how to avoid the two mistakes that force people to open a finished floor twice.
What exactly is a rough-in valve on a freestanding tub faucet?
The rough-in valve is the hidden brass mixing body that installs under the floor during construction and connects to your home’s hot and cold supply lines. The decorative faucet — the tall filler with the spout and handles — mounts on top of it after the floor is finished. In plumbing terms, you “rough in” the valve first (before tile, flooring, and the finished walls), then install the “trim” (the visible faucet) at the very end. It’s the same two-stage logic as a shower valve, just for a tub filler.
Here’s why it matters for buying: the visible faucet alone cannot support itself or mix water. It needs that valve as an anchor and as its plumbing engine. Some brands sell the filler and valve as a bundled kit; others sell them separately, which is where shoppers get burned — they buy a gorgeous $300 filler, schedule the plumber, and discover on install day that the mating valve is a separate $150 part on backorder.
Not every freestanding filler uses a floor rough-in, though. There are three broad mounting styles, and only one truly depends on a floor rough-in valve.
- Floor-mounted freestanding filler: stands on the floor beside the tub and requires a floor rough-in valve buried in the subfloor. This is the classic “waterfall pouring into a clawfoot tub” look and the main subject of this article.
- Deck-mounted filler: mounts on the flat rim of the tub itself; its valve sits under the tub deck, not the floor.
- Wall-mounted filler: comes out of the wall behind the tub and uses an in-wall rough-in valve instead of a floor one.
Do you actually need a separate rough-in valve, or is it built in?
For a floor-mounted freestanding tub faucet, you almost always need the rough-in valve — and on most quality brands it’s a separate component even when it ships in the same box. The filler you see is trim; the valve is the plumbing. The only fillers that don’t need a floor rough-in are deck-mounted and wall-mounted models, which use different valve bodies entirely.
The confusion comes from marketing photos. A listing shows a single elegant faucet and calls it “complete,” but “complete” sometimes means trim-only. Before you buy, look for one of two things in the spec sheet: either a line item that says “rough-in valve included” (a true kit), or a clearly listed compatible valve model number you must order alongside it. If you can’t find either, message the seller before checkout — this one question saves the most grief of anything in a freestanding tub project.
A good rule: budget for the valve as a real line item, not an afterthought. A $250 filler with a $150 valve is a $400 project, and pretending the valve is free is how people blow their budget at the register.
What’s the difference between a rough-in valve and a floor-mount kit?
The rough-in valve is the water-mixing body; the floor-mount kit is the complete package that includes the valve, the visible filler, the mounting bracket, and the trim ring that hides the floor penetration. If you buy a “floor-mount installation kit,” the rough-in valve is usually inside it. If you buy just the “faucet,” it usually isn’t. Read the components list, not the headline.
| Component | What it is | Visible after install? | Installed at which stage? |
|---|---|---|---|
| Rough-in valve | Brass mixing body + supply connections | No — buried in floor | Rough-in (before flooring) |
| Mounting bracket / plate | Anchors the filler to the subfloor | No — under trim ring | Rough-in |
| Filler (trim) | Spout, handles, hand shower | Yes | Finish (after flooring) |
| Trim ring / cover plate | Hides the floor hole | Yes | Finish |
This two-stage split is exactly why freestanding tub projects reward planning. If you’re doing this yourself, our step-by-step walkthrough of a freestanding tub faucet floor mount installation shows how the valve and bracket go in before the finished floor. And because the logic mirrors a concealed shower, the same skills carry over from learning how to install a shower valve kit — same rough-in-then-trim rhythm, different fixture.
How do I know which rough-in valve fits — what specs actually matter?
Match four numbers and you’re safe: the valve-to-supply spread, the supply inlet size, the floor thickness capacity, and the flow rate. Get these right and any compatible filler drops on cleanly; get the spread wrong and you’ll be relocating supply lines inside a finished floor.
- Spread (center-to-center): the distance the valve expects between your hot and cold floor supply lines — commonly 7 to 9 inches. Your plumber sets your rough plumbing to match this exact number, so confirm it before the concrete or subfloor is closed.
- Supply inlet size: most residential rough-in valves use 1/2-inch inlets (NPT or copper sweat). Confirm whether your home runs 1/2-inch or 3/8-inch so you don’t need an adapter mid-install.
- Floor thickness / adjustable height: the valve and mounting post must accommodate your finished floor buildup (subfloor + underlayment + tile or wood). Quality valves have an adjustable stem so the filler sits at the right height after flooring.
- Flow rate (GPM): a tub filler should move real water — look for roughly 6–10 GPM so a large freestanding tub fills in a reasonable time. A 1.2 GPM lavatory-style flow will leave you waiting 20 minutes.
If you’re tiling and later realize the valve sits slightly too deep, don’t panic and don’t demolish — an adjustable extension can rescue the height, similar to how a faucet valve extender saves tiled installations elsewhere in the bathroom. It’s the small parts like these that separate a clean finish from a callback.
Which finish and material should you choose for a tub filler that lasts?
Choose a solid brass valve body and a solid-brass or stainless filler with a PVD (physical vapor deposition) finish — that combination resists corrosion, handles daily use, and keeps its color for years. Skip thin zinc fillers for the visible tub-side piece if you can, because a freestanding filler is tall, hand-touched constantly, and splashed daily.
The material question genuinely affects lifespan and price, so it’s worth understanding before you commit. We break down the trade-offs in detail in our guide on zinc alloy vs stainless steel faucet construction — the short version is that solid brass and stainless win for wet, heavy-use fixtures, while zinc alloy is fine for lighter-duty or budget builds. On finish, brushed nickel remains the most forgiving choice because it hides water spots and fingerprints; if that’s your lean, our overview of the brushed nickel tap mixer covers how the finish wears over time.
| Finish | Best for | Shows spots/fingerprints? | Relative cost |
|---|---|---|---|
| Polished chrome | Bright, classic, easy to clean | Yes, water spots show | $ |
| Brushed nickel | Hiding smudges, warm neutral look | Rarely | $$ |
| Matte black | Modern contrast against white tubs | Some, needs wiping | $$ |
| Brushed gold / champagne bronze | Statement, warm luxury feel | Rarely | $$$ |
| Oil-rubbed bronze | Traditional, vintage bathrooms | No, patinas over time | $$ |
What does a freestanding tub faucet with rough-in valve cost in 2026?
Expect $180 to $700 for the complete system in 2026, plus $150–$450 in labor if a plumber sets the rough-in and returns for trim. Budget floor-mount kits with the valve included run $180–$300; mid-range solid-brass systems with a hand shower run $300–$500; premium designer fillers in gold or matte finishes reach $500–$700 or more.
Where people overspend is by treating the valve as a surprise. Where people undersave is by buying the cheapest thin-wall filler, which wobbles at the floor and discolors within a year or two. A sensible sweet spot for most homeowners is a mid-range kit with a solid-brass valve, an included rough-in, and a PVD finish — enough quality to last a decade without paying for a designer nameplate.
One more budget note: because the valve installs during rough plumbing, coordinate timing with your contractor. A rough-in valve bought late — after the floor is already poured or the tub is set — can turn a $40 part into a $400 demolition. Buy the whole system early.
How do you install the rough-in valve — the short version?
You install the rough-in valve during the plumbing rough-in stage: set the valve body in the floor, connect it to hot and cold supply lines at the correct spread, secure the mounting bracket to the subfloor, pressure-test for leaks, then finish the floor and install the visible filler last. It’s very doable for a confident DIYer, but the pressure test before you close the floor is the step you cannot skip.
Here’s the sequence in plain terms:
- Confirm the valve’s required spread and mark your hot/cold supply positions on the subfloor.
- Run and connect the supply lines to the valve inlets (solder, push-fit, or threaded per your setup).
- Anchor the mounting bracket firmly to the subfloor so the filler won’t wobble.
- Turn on the water and pressure-test the connections — check every joint for weeping.
- Only after a clean test, finish the floor (tile, wood, or LVP) around the trim opening.
- Mount the filler, connect it to the valve stem, install the trim ring, and test flow.
The single most common failure is skipping the pre-tile leak test. A drip you can fix in five minutes now becomes a torn-up floor later. Take the extra hour.
FAQ
Can I install a freestanding tub faucet without a rough-in valve?
Only if you choose a deck-mounted or wall-mounted filler instead. A true floor-mounted freestanding tub faucet needs a floor rough-in valve — it’s both the water-mixing body and the structural anchor that keeps the tall filler from wobbling. There’s no floor-mount version that skips it.
Is the rough-in valve always included with the faucet?
No. Some brands sell a complete floor-mount kit with the valve inside; many sell the visible filler and the rough-in valve as separate parts. Always read the components list before checkout and, if it’s unclear, ask the seller whether the rough-in valve is included. This is the number-one thing shoppers miss.
What spread should the hot and cold supply lines be for a floor-mount valve?
Most residential rough-in valves expect a 7- to 9-inch center-to-center spread, but you must match the exact number on your specific valve’s spec sheet. Your plumber sets the rough plumbing to that measurement, so confirm it before the floor is closed up.
Can I install the rough-in valve after my bathroom floor is already finished?
It’s difficult and usually means opening the finished floor, so it’s strongly discouraged. The valve is designed to go in during the plumbing rough-in stage, before flooring. If your floor is already done, talk to a plumber about your options — in many cases a deck-mounted or wall-mounted filler becomes the more practical route.
How long does a freestanding tub with rough-in valve take to fill?
With a proper tub filler flowing at roughly 6–10 GPM, a standard 60-gallon freestanding tub fills in about 6–10 minutes. If your filler is spec’d at a low lavatory-style flow rate, filling can drag past 20 minutes — which is why flow rate is a real spec to check, not a footnote.
Do I need a plumber, or can I DIY the whole thing?
A confident DIYer with soldering or push-fit experience can handle it, especially the trim stage. But the rough-in — setting the valve, matching the spread, and pressure-testing before the floor closes — is where mistakes get expensive. If you’re unsure about the supply connections, hire a plumber for the rough-in and do the trim yourself to split the cost.
A note on trust, testing, and warranty
Author note: This guide was written by the wigafaucet product team, who spec, pressure-test, and photograph freestanding tub fillers and their rough-in valves before they ever reach a product page. We’ve handled the exact “valve sold separately” confusion this article warns about, which is why we bundle and clearly label our floor-mount systems.
Brand credibility: wigafaucet designs faucets and bathroom fixtures for real homes and busy commercial bathrooms, and every rough-in valve we ship uses a solid-brass body. Our fillers are built to standard 1/2-inch supply connections so they work with typical North American residential plumbing without oddball adapters.
Testing, standards & warranty: Reputable tub fillers should meet recognized low-lead and performance standards (such as NSF/ANSI 61 and 372 for lead content) and ship with a written warranty on both finish and function. wigafaucet freestanding systems are pressure-tested before shipping and backed by a limited lifetime warranty on the valve body — always keep your model and valve part numbers on file so replacement cartridges and trim match years later.